As part of my dashboard project, I quickly realized that for complicated widgets, the math for positioning components is cumbersome to both build and maintain. I’m in the process of building a weather widget, and there’s a fair amount of labels, images, etc. Computing the positions of all these manually is pretty tedious. Writing this to use more high-level markup to define the layout vastly increased my velocity on the rendering portion of this widget.
I decided to build a simple layout engine inspired by parts of the CSS FlexBox, to auto compute the bounds of labels, images, etc. in the widgets.
Assumptions
There are a couple key assumptions and constraints I’m working with:
- The screen size is fixed
- Widgets render into the size they are given
With these in mind, given a screen size, we can apply some algorithms procedurally to compute sizes of a decently complex set of nested flex rows & columns, including their padding (which may differ on each side), and the flex gap.
To keep things simple, I’m not supporting flex wrap, or any size constraints on the flex items themselves, other than their relative weight to each other. This determines how much of the space relative to the rest of the items in the row/column the box should get.
Output
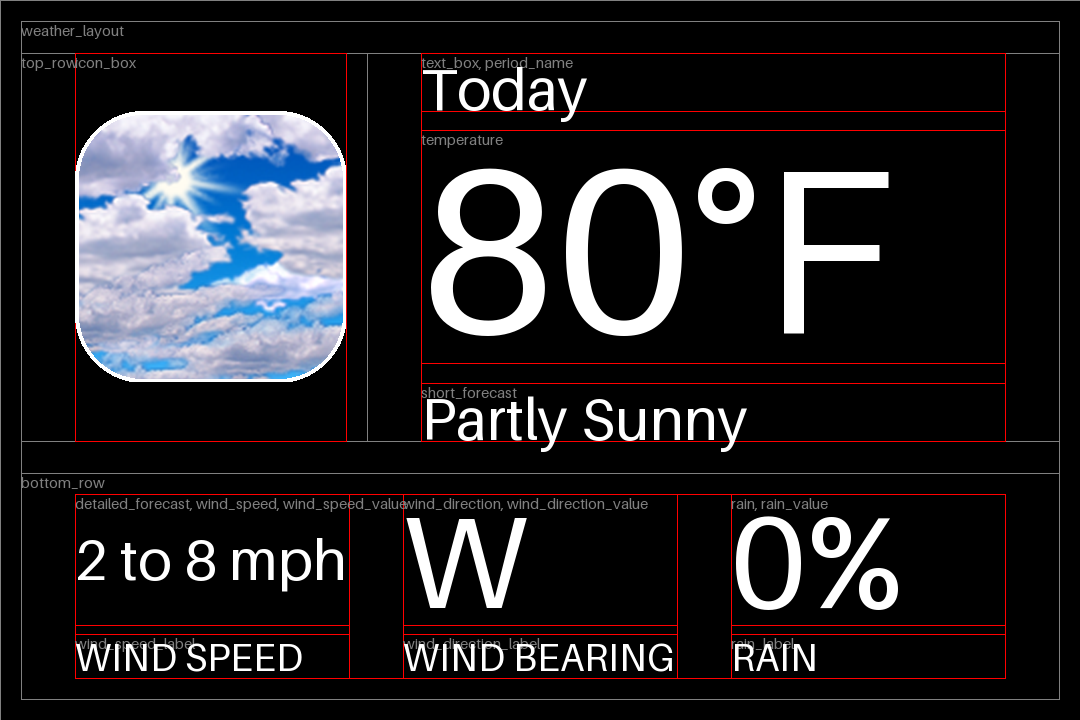
First, we’ll start with how this could be used.

You’ll notice both red and gray boxes. The gray ones are the border of each box, and the red boxes are the inside of the box’s padding.
As you’ll see in the next section, even though it’s using Python classes, the properties you can set are pretty similar to how you might structure a flexbox layout using HTML/CSS.
(now in fb-dashboard, most widgets that use flexbox can show them if you set their debug option to true, or pass --debug on the command line)
Example Layout
We can construct a layout like I’ve done in the example below. This runs recursively, so a box can have children, which can have their own as well. Each box has a flex direction, padding, and gap.
This evenly divides space within a box to each of its children, in the correct direction and with the specified gap. Assigning a weight to a child gives it space relative to the other children’s weights. By default, each weight is set to 1.
Both the paddings and gaps can be absolute values in pixels, or values relative to the root view size (using vw and vh units as in CSS). Percentages of the current direction can also be used, so a gap of 5% yields a gap of 0.05 * box_width.
weather_layout = SimpleFlexBox(
    identifier="weather_layout",
    flex_direction="column",
    padding='2vw',
    children=[
        SimpleFlexBox(
            identifier="top_row",
            flex_direction="row",
            weight=2,
            padding=('5vw', 0, '5vw', 0),
            children=[
                SimpleFlexBox(
                    identifier="icon_box",
                    padding=(0, '2vw', 0, '5vw'),
                ),
                SimpleFlexBox(
                    identifier="text_box",
                    padding=(0, '5vw', 0, '5vw'),
                    gap='5%',
                    weight=2,
                    flex_direction='column',
                    children=[
                        SimpleFlexBox(
                            identifier="period_name",
                        ),
                        SimpleFlexBox(
                            identifier="temperature",
                            weight=4
                        ),
                        SimpleFlexBox(
                            identifier="short_forecast",
                        )
                    ]
                )
            ]
        ),
        SimpleFlexBox(
            identifier="bottom_row",
            flex_direction="row",
            children=[
                SimpleFlexBox(
                    identifier="detailed_forecast",
                    padding=('2vw', '5vw', '2vw', '5vw'),
                    gap='5vw',
                    children=[
                        SimpleFlexBox(
                            identifier='wind_speed',
                            flex_direction='column',
                            gap='5%',
                            children=[
                                SimpleFlexBox(
                                    identifier='wind_speed_value',
                                    weight=3
                                ),
                                SimpleFlexBox(
                                    identifier='wind_speed_label'
                                ),
                            ]
                        ),
                        SimpleFlexBox(
                            identifier='wind_direction',
                            flex_direction='column',
                            gap='5%',
                            children=[
                                SimpleFlexBox(
                                    identifier='wind_direction_value',
                                    weight=3
                                ),
                                SimpleFlexBox(
                                    identifier='wind_direction_label'
                                ),
                            ]
                        ),
                        SimpleFlexBox(
                            identifier='rain',
                            flex_direction='column',
                            gap='5%',
                            children=[
                                SimpleFlexBox(
                                    identifier='rain_value',
                                    weight=3
                                ),
                                SimpleFlexBox(
                                    identifier='rain_label'
                                ),
                            ]
                        ),
                    ]
                )
            ]
        )
    ]
)
Output
Running the compute_sizes function with an offset/region returns a list of all the box identifiers and their absolute positions on screen.
layout = weather_layout.compute_sizes(0, 0, self.width, self.height)

# this outputs:
{'bottom_row': {'box': (20, 505, 984, 243), 'content_box': (20, 505, 984, 243)},
 'detailed_forecast': {'box': (20, 505, 984, 243),
                       'content_box': (71, 525, 882, 203)},
 'icon_box': {'box': (20, 20, 328, 485), 'content_box': (71, 71, 226, 383)},
 'period_name': {'box': (399, 71, 554, 56), 'content_box': (399, 71, 554, 56)},
 'short_forecast': {'box': (399, 398, 554, 56),
                    'content_box': (399, 398, 554, 56)},
 'temperature': {'box': (399, 151, 554, 224),
                 'content_box': (399, 151, 554, 224)},
 'text_box': {'box': (348, 20, 656, 485), 'content_box': (399, 71, 554, 383)},
 'top_row': {'box': (20, 20, 984, 485), 'content_box': (20, 20, 984, 485)},
 'weather_layout': {'box': (0, 0, 1024, 768),
                    'content_box': (20, 20, 984, 728)},
 'wind_direction': {'box': (538, 525, 416, 203),
                    'content_box': (538, 525, 416, 203)},
 'wind_speed': {'box': (71, 525, 416, 203), 'content_box': (71, 525, 416, 203)}}
Source Code
You can find the source code here. It also needs the util.py file which contains some utilities for evaluating expressions related to sizing.
https://github.com/richinfante/fb-dashboard/blob/main/fb_dashboard/sfxbox.py
The rest of the dashboard project can also be found in the same repo.

